


3D printers are accessible to users of all skill levels, yet they remain a delicate process where many factors can cause imperfections. From layers lifting to irregular extrusion, every defect can be considered a 3D printing problem that needs to be resolved.
In this article, we review the most common 3D printing problems and how to fix them, helping you achieve precise and reliable parts.
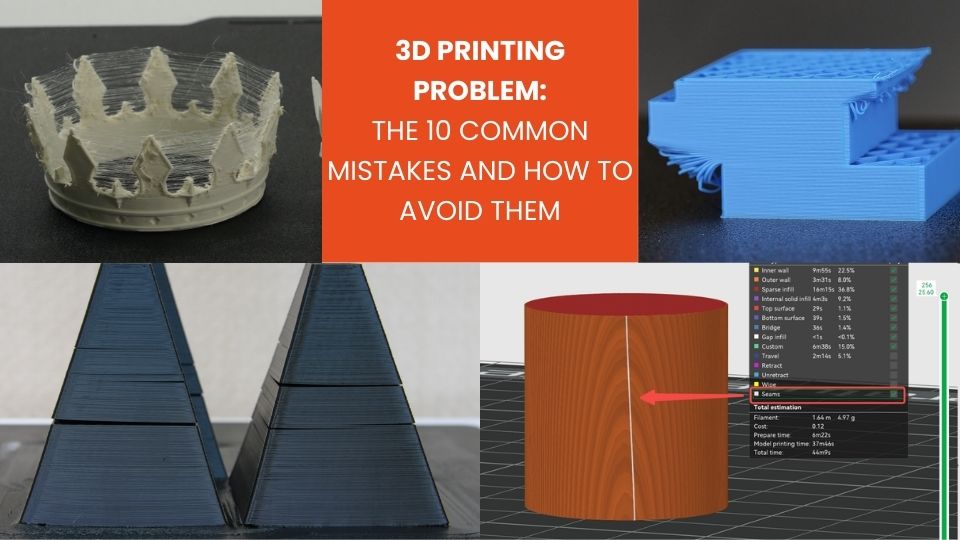
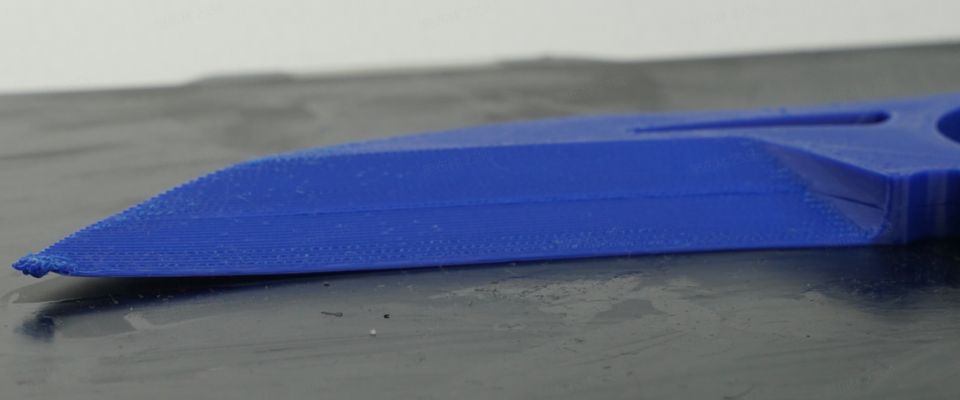
Irregular extrusion or under-extrusion: identifying the 3D printing problem
Under-extrusion is a 3D printing problem that results in missing layers, thin lines, or rough surfaces. It can be caused by an incorrect filament diameter, a partially clogged nozzle, excessive speed, or insufficient hotend temperature. Even the extruder motor tension can affect extrusion consistency.
Solution: Check the filament diameter and enter the exact value in your slicer. Clean or replace the nozzle if necessary.
Adjust the hotend temperature according to the material and reduce print speed to improve consistency. Check the extruder spring tension to ensure the filament is properly driven.
Run a calibration test with a simple pattern to determine whether under-extrusion persists.
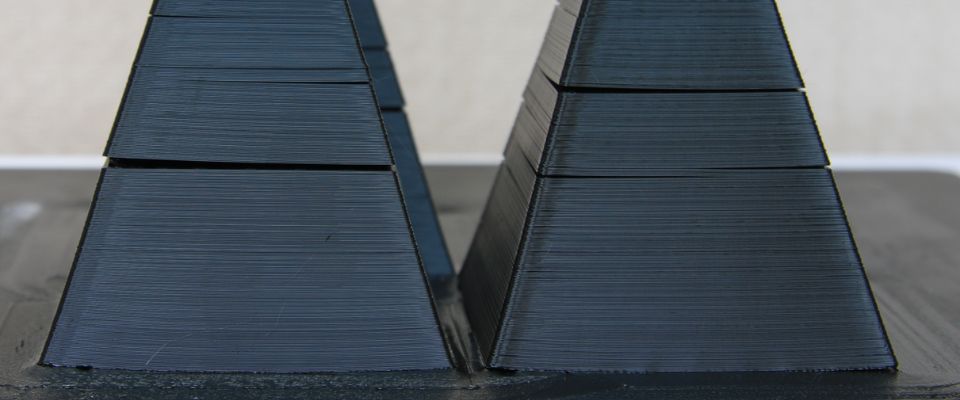
Part lifting or warping: a common 3D printing problem
Part lifting is a classic 3D printing problem, especially with materials such as ABS. It occurs when the corners of an object lift off the build plate during printing. The main causes include poor bed leveling, insufficient bed temperature, or thermal variations within the part. This phenomenon leads to visual defects and can compromise dimensional accuracy.
Solution: To prevent warping, start by properly leveling the build plate and ensuring it is clean and adhesive. Using tape, glue, or adhesion spray can significantly improve bed grip.
Adjust the bed temperature according to the material: PLA generally requires 50–70 °C, while ABS may need 90–110 °C. Print outer walls slowly to reduce thermal stress, and use an enclosed chamber to minimize temperature fluctuations.
Over-extrusion and excess filament
Over-extrusion causes excessive material deposition, leading to blobs, uneven surfaces, and sometimes clogs. Common causes include a flow rate set too high in the slicer, excessive temperature, or very slow printing speeds. It remains a recurring 3D printing problem, especially on large parts.
Solution: Reduce the extrusion multiplier or flow rate in your slicer to around 95–100%. Ensure the hotend temperature matches the material to prevent excessive flow.
Adjust the print speed to balance material deposition and run a calibration test to confirm layer uniformity.
Also make sure your filament is high quality and has not absorbed excessive moisture.
Stringing: one of the recurring 3D printing problems
Stringing is another frequent 3D printing problem where thin strands form between different sections of a part, creating a spiderweb-like effect. It is caused by inadequate retraction, excessive nozzle temperature, or long travel movements.
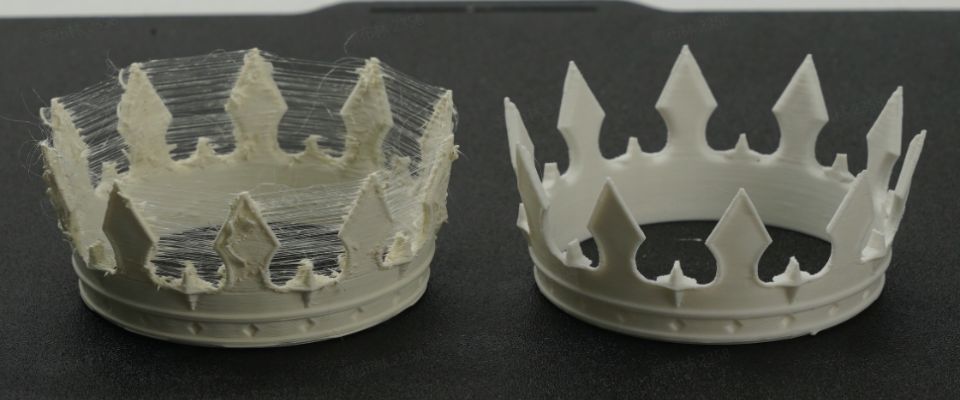
Solution: Enable and fine-tune retraction settings in your slicer. Slightly reduce extrusion temperature to limit oozing during travel moves.
Fast and precise travel movements also reduce stringing. Print test towers to optimize retraction distance and speed.
Layer shifting or misalignment
Layer shifting occurs when layers no longer align correctly. Causes include an unstable frame, loose belts, stepper motors skipping steps, or mechanical obstruction during printing.
Solution: Ensure the printer is placed on a stable surface and that the build plate is securely fixed. Tighten belts and lubricate axes if necessary. Check motor connectors and wiring for loose contacts.
Reduce print speed if the issue persists and manually test axis movement to detect resistance or blockage.
Poor first layer adhesion: fixing this 3D printing problem
A first layer that does not adhere properly is a common 3D printing problem, often leading to failed prints from the start. Causes include a dirty or uneven bed, the nozzle being too far from the surface, or an excessively high first-layer speed.
Solution: Clean the build plate with isopropyl alcohol to remove grease. Adjust nozzle height so the filament is slightly compressed onto the surface.
Lower first-layer speed to 20–30 mm/s and increase nozzle temperature slightly to improve adhesion.
Finally, enable brim or raft features in your slicer to increase contact area.
Blobs or surface zits
Blobs are small bumps or surface imperfections, a 3D printing problem often caused by inconsistent flow, improper retraction settings, or sudden direction changes.
Solution: Fine-tune retraction and jerk/speed parameters in your slicer. Ensure stable extrusion temperature.
A clean, unobstructed nozzle is essential. For sharp corners, slightly reduce print speed to avoid excess material buildup.
Internal warping or cracking
Some materials like ABS or PETG may develop internal cracks or warping due to thermal shock or excessive cooling between layers. This is another significant 3D printing problem.
Solution: Print in a temperature-stable environment, use an enclosure, reduce excessive cooling, and slightly increase extrusion temperature. Adding solid walls or a brim can strengthen corners and prevent cracks.
Hardware issue: unlevel build plate
An unlevel build plate is often the root cause of multiple 3D printing problems. Prints become uneven, first layers fail, and final parts appear distorted.
Solution: Use auto-leveling if available or manually level the bed using a sheet of paper and careful adjustment. Recheck leveling regularly, especially after transport or maintenance.
A uniform first layer is essential for successful printing.
Clogged nozzle
A clogged nozzle is a classic 3D printing problem that prevents proper material flow and causes under-extrusion. It may result from poor-quality filament or leftover residue from previous prints.
Solution: Clean the nozzle while hot or perform a cold pull. Use quality filament and store it in dry conditions.
Ensure printing temperature matches the selected material.
Excessive noise and vibrations
Unusual noises or vibrations can damage mechanical components and affect print quality. They often stem from poorly lubricated axes, loose belts, or unsecured parts.
Solution: Tighten all screws, lubricate axes, check belt tension, and place the printer on a stable surface.
Adjust acceleration and speed settings to reduce mechanical stress.
Conclusion
FDM 3D printing problems are numerous, but each can be solved by analyzing the causes and methodically adjusting settings. A clean and leveled bed, high-quality 3D filament, well-maintained hotend and nozzle, and proper material settings are essential. With patience, defects become easier to anticipate and correct, leading to accurate and reliable prints.
If you would like to learn more about a specific 3D printing problem or are facing a different issue, feel free to leave a comment below. Our high-performance support team is available to answer your questions and help you optimize your 3D printing results.
Your experience and feedback can also help the community better understand and resolve common 3D printing problems.
✅ Why Choose Polyfab3D?
Premium Support and After-Sales Service: Starting from your needs, we will guide you to the most suitable solution and provide long-term support for its implementation and daily use.
Official Reseller: Polyfab3D is a certified reseller of top brands, ensuring you get official products, exclusive access to the latest innovations, and priority technical support.
Fast Delivery and Customer Satisfaction: Polyfab3D is committed to providing you with an optimal and fast experience. Positive feedback from our customers rewards us and proves the reliability and efficiency of our service.
Contact us now for a personalized recommendation tailored to your needs, budget, and ambitions.