


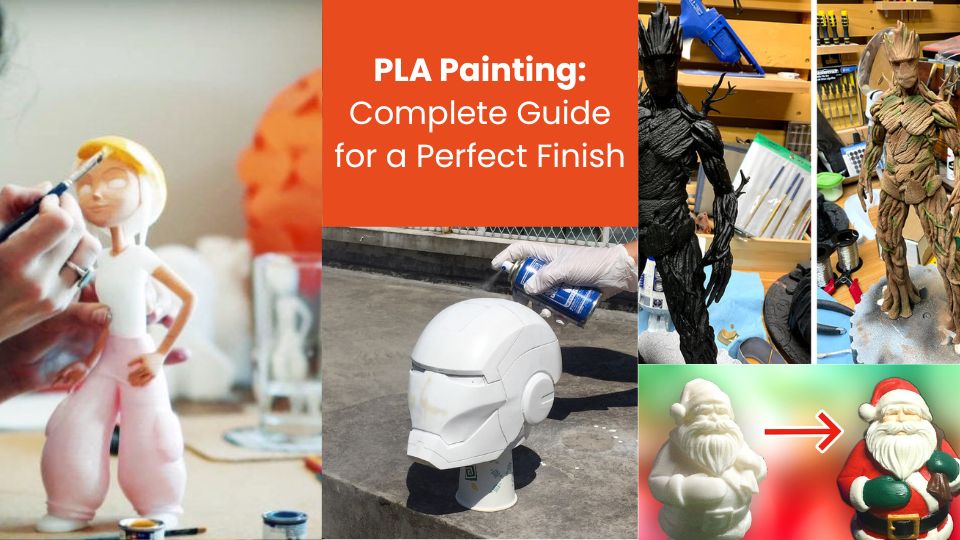
You’ve just finished a PLA 3D print, but it looks a bit dull? Painting PLA is one of the best ways to bring your 3D printed models to life.
Easy to apply and delivering impressive results, it transforms a raw part into a true decorative or functional object.
In this guide, learn how to paint PLA effectively, from sanding to glossy finishing.
Why paint PLA?
First of all, PLA naturally has a matte plastic finish. By painting it, you can:
- hide visible layer lines,
- improve overall appearance,
- customize your parts as you like,
- add light protection against UV or humidity.
That’s why painting becomes an essential part of post-processing.
Should PLA be prepared before painting?
Absolutely. A great finish always starts with proper preparation. First, you should:
- carefully remove any remaining supports,
- sand gradually (starting from grit 120 up to 800 or more),
- thoroughly clean with a damp cloth or isopropyl alcohol.
Next, applying a primer is highly recommended. It improves paint adhesion and smooths the surface, especially for detailed or intricate objects.
Which paint to choose for PLA?
Here are the main options:
| Paint type | Advantages | Disadvantages |
|---|---|---|
| Acrylic (spray or brush) | Easy to find, fast drying | Requires primer for good adhesion |
| Model paint (Tamiya, Vallejo) | High-quality finish, fine pigments | More expensive |
| Oil paint | Rich colors | Slow drying |
| Special effects (metallic, chrome, pearlescent) | Striking finish | May be fragile without clear coat |
In short, acrylic spray paint is the easiest for beginners. However, if you’re aiming for a professional look, airbrushed model paints work wonders.
Key steps: how to paint a PLA print?
Step 1: Sanding
Start with 120-grit sandpaper and work up to 600–800. For a very smooth finish, you can wet sand with 400 and up.
Step 2: Priming
Use a plastic-specific or universal primer spray. Apply in thin cross coats, 20–30 cm from the object. Let dry for at least 30 minutes.
Cost and time reduction:
Need a prototype or final part in just a few hours, without tools or outsourcing? 3D printing makes it possible – at low cost.
Step 3: Painting
Spray several light coats. Wait 10–15 minutes between each. Avoid overloading.
Step 4: Clear coat (optional but recommended)
It protects the paint and gives the desired finish: matte, satin, or gloss. Two coats are usually enough.
Common mistakes to avoid
Don’t skip prep: painting without sanding is like sticking tape to dust—it won’t hold well.
Also, applying coats that are too thick will inevitably cause ugly drips. And don’t forget: each coat needs proper drying time, or the finish will be uneven—or sticky.
Lastly, patience is your best friend: rushing the drying process will compromise durability.
Frequently Asked Questions (FAQ)
Can you paint PLA with any type of paint?
No. Avoid aggressive solvents. Stick with acrylic or model paints.
Is sanding necessary before painting?
Yes, it’s crucial to smooth the surface and ensure good adhesion.
Can you paint indoors?
Yes, as long as you have proper ventilation or use a paint booth.
Conclusion
In the end, painting a PLA 3D print is easy—as long as you follow the key steps. From surface prep to clear coating, every step matters.
With the right paint, your printed objects will take on a whole new life. It’s your turn!
✅ Why Choose Polyfab3D?
Premium Support and After-Sales Service: Starting from your needs, we will guide you to the most suitable solution and provide long-term support for its implementation and daily use.
Official Reseller: Polyfab3D is a certified reseller of top brands, ensuring you get official products, exclusive access to the latest innovations, and priority technical support.
Fast Delivery and Customer Satisfaction: Polyfab3D is committed to providing you with an optimal and fast experience. Positive feedback from our customers rewards us and proves the reliability and efficiency of our service.
Contact us now for a personalized recommendation tailored to your needs, budget, and ambitions.