


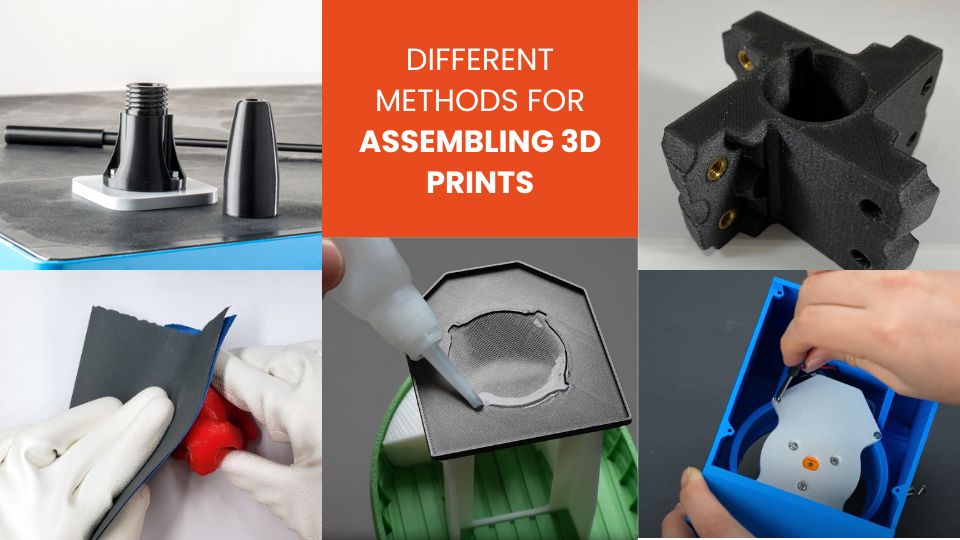
When you take a printed part off the printer, it’s often just the beginning of the work. Very often, you need to assemble multiple components to create a functional object.
Whether it’s to exceed the build volume, combine different materials, integrate moving parts, or facilitate maintenance, knowing how to assemble parts correctly is an essential skill.
In this article, we review common methods, their advantages, limitations, and recommendations based on practical experience.
1. Why Assemble?
1.1 Technical Limitations
Machines have volume constraints. If your object exceeds the 3D printer’s capacity, you have to split it and glue it back together. Some complex designs are easier to manage piece by piece.
1.2 Material Control
Assembly allows you to use different materials in the same object: a rigid part, a flexible part, or integrate non-printable components such as shafts, bearings, or screws.
1.3 Repairability and Modularity
A piece-by-piece object is easier to repair. You can replace a damaged section without reprinting the entire part.
2. Overview of Assembly Methods
The main assembly families encountered in additive manufacturing are:
- – Chemical bonding / adhesives
- – Plastic welding (fusion, friction)
- – Mechanical fastening (screws, inserts, rivets)
- – Snap-fits, magnets, integrated locks
- – Hybrid techniques (solvent + reinforcement, overmolding)
3. Adhesive Bonding
Advantages and Limitations
Bonding is often the designer’s reflex because it is simple and fast. It gives a clean and nearly invisible surface when done correctly. Adhesion depends entirely on surface compatibility and the type of glue. Some plastics, such as polypropylene, resist common adhesives.
Common Adhesives
- Cyanoacrylate: fast bonding on many rigid plastics, low tolerance to bending.
- Two-component epoxy: higher mechanical strength, longer curing time.
- PVC / solvent cements: slightly dissolve surfaces to fuse them.
- Flexible adhesives: useful for joints subjected to bending or vibration.
Best Practices
For effective bonding, it is essential to prepare the surfaces: lightly sand to increase roughness and clean to remove grease or residues. Apply a thin layer of adhesive and hold the pieces with clamps until fully cured. Testing the adhesive on a sample before final assembly is always recommended.
4. Plastic Welding (Fusion / Friction / Solvent)
Principle
The idea is to slightly fuse the surfaces of two parts to create a homogeneous bond, similar to the original additive process.
Techniques
- Thermal welding: plastic soldering iron or hot air.
- Friction welding: heat generated by rubbing to fuse interfaces.
- Chemical welding: applying mild solvents that dissolve the surface, then reforming the material.
- Ultrasonic welding: high-frequency vibration for local fusion.
Limitations and Conditions
Plastic welding requires parts to be of the same material or compatible. Layer orientation should be optimized to avoid weak points, and areas may need to be rounded to prevent stress concentration. Precise heat control is crucial to avoid warping or bubbles. When executed correctly, this technique provides excellent mechanical strength.
5. Mechanical Fastening (Screws, Inserts, Rivets)
Why Use It
For removable or strong assemblies, mechanical fasteners are often preferred.
Screws & Inserts
You can design threads or drill holes for self-tapping screws. Heated metal inserts are ideal for creating durable threads in plastic, enhancing resistance to repeated screwing.
Rivets and Clips
For permanent assemblies, printed rivets and clips suit parts that do not require frequent disassembly. Built-in design mechanisms such as clips or magnet housings provide a quick and clean solution.
6. Hybrid Techniques & Reinforcement
In some cases, combining multiple methods maximizes strength and aesthetics. For instance, gluing and then inserting metal brackets reinforces the joint.
Partial overmolding can solidify a printed skeleton. Combining chemical fusion and mechanical fastening achieves a durable and reliable assembly.
These hybrid approaches optimize strength, sealing, and finish depending on requirements.
7. Choosing the Method According to Context
| Criterion | Preferred Method | Notes |
|---|---|---|
| Maximum structural strength | Insert + adhesive / welding | Optimal load transfer |
| Need for disassembly | Screws or threaded inserts | Durable without permanent bonding |
| Clean surface | Chemical or fusion welding | Reduces visible marks |
| Flexibility or dynamic stress | Flexible adhesive / integrated clips | Overmolding or hinges possible |
| Specific material compatibility | Welding same type or adapted insert | Some plastics resist adhesives |
Conclusion and Limitations
Even the best joints have their limits. Poorly distributed adhesive creates stress points. Improperly heated inserts can cause cracks. Some methods require specific tools, such as a soldering iron or rotary tool.
Assembling parts is not just about gluing; it’s a technical choice dependent on design, material, functionality, longevity, and sometimes aesthetics.
Integrating connections during modeling and combining methods when necessary transforms a simple printed object into a robust, modular, and durable solution. This overview helps understand each method’s limitations and explore advanced tools to optimize your assemblies.
✅ Why Choose Polyfab3D?
Premium Support and After-Sales Service: Starting from your needs, we will guide you to the most suitable solution and provide long-term support for its implementation and daily use.
Official Reseller: Polyfab3D is a certified reseller of top brands, ensuring you get official products, exclusive access to the latest innovations, and priority technical support.
Fast Delivery and Customer Satisfaction: Polyfab3D is committed to providing you with an optimal and fast experience. Positive feedback from our customers rewards us and proves the reliability and efficiency of our service.
Contact us now for a personalized recommendation tailored to your needs, budget, and ambitions.